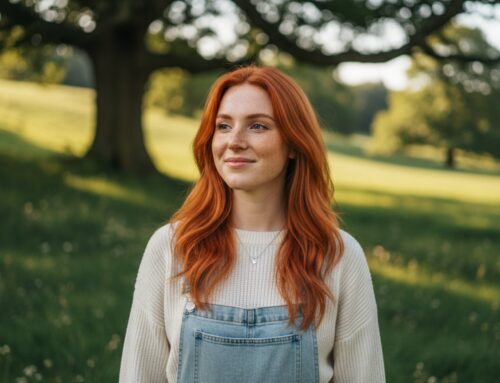
Less than 2% of the global population carries the ginger gene, yet most digital cameras are still programmed to treat your rare look like a technical glitch. You’ve likely felt the frustration of a golden hour shoot that turns your vibrant hair a muddy brown or makes your skin appear overly pink. It’s annoying when the camera doesn’t see what you see in the mirror. Mastering redhead photography requires a specific strategy to handle these unique tones.
We know that looking your best takes work, especially when you want a profile that stands out to a potential partner in crime. You deserve photos that capture your energy and make you feel confident. This guide delivers the professional techniques for lighting, styling, and posing to ensure your hair pops in every single frame.
We’re going to break down the exact color palettes that complement ginger hair and the lighting secrets that prevent washed-out skin. From camera settings to wardrobe choices, you’ll get the tools needed to turn every photo session into a celebration of your identity.
Key Takeaways
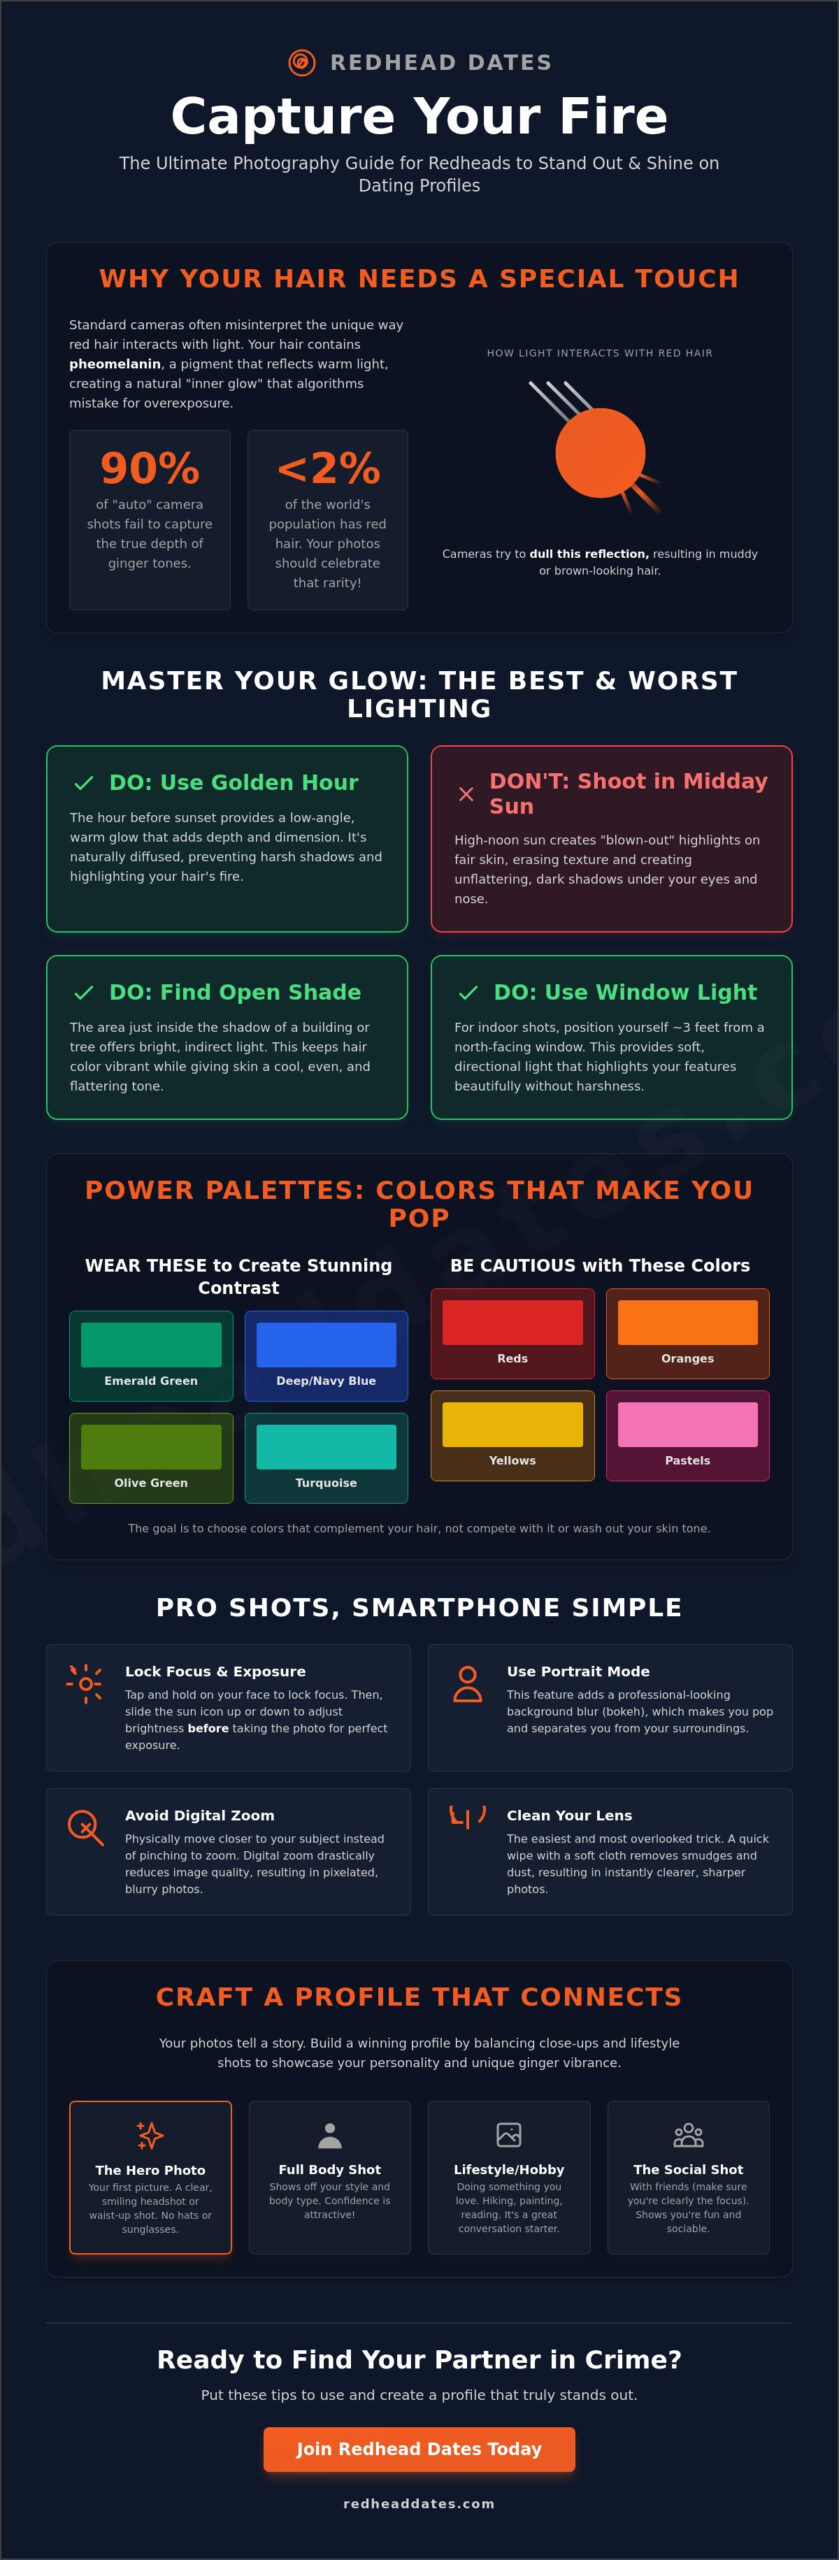
- Master the “Golden Hour” to illuminate your natural glow while avoiding the harsh sun that often washes out porcelain skin.
- Learn the essential color theory secrets, like using emerald and olive tones, to create a stunning contrast with your ginger hair.
- Elevate your redhead photography using pro-level smartphone tricks that capture every vibrant detail with perfect depth.
- Discover how to select a “Hero Photo” that stops the scroll and helps you find your next ginger partner in crime.
- Build a winning profile by balancing close-ups and lifestyle shots to show off your personality and unique ginger vibrance.
The Science of Redhead Photography: Why It Requires a Specialized Approach
Capturing the perfect shot of a ginger isn’t just about having a fancy camera. It’s about understanding biology. Redhead photography is a specific skill because red hair behaves differently under light than any other color. Most digital sensors are calibrated for common pigments, so they often struggle with the unique brilliance of ginger locks. If you want to stand out, you have to move beyond the basic settings.
The secret lies in the pigment itself. The Science of Red Hair explains that redheads carry pheomelanin instead of the more common eumelanin. This pigment has a unique molecular shape that reflects warm light rather than absorbing it. This is why a redhead’s hair can look like it is glowing from the inside when the sun hits it just right. If you use generic “auto” settings, your camera will likely try to dull this down. It sees the bright reflection and assumes the image is overexposed. This results in hair that looks muddy or brown instead of vibrant and fiery. About 90% of “auto” shots fail to capture the true depth of ginger tones because the camera’s brain just isn’t built for this level of warmth.
If you’re looking for your redhead partner in crime on a dating site, your photos need to be top-tier. A blurry, poorly lit photo doesn’t do justice to your unique look. It takes work to get these shots right, but the payoff is huge. High-quality images increase profile engagement by over 60% in niche communities. You want to show off that 1% rarity with pride and precision.
The Unique Light Reflex of Ginger Hair
Red hair acts as a natural reflector. When light hits a strand of ginger hair, it doesn’t just sit there. It bounces. This creates what photographers call an “inner glow.” To capture this, you need directional light. Avoid flat, overhead lighting. If the light is too “flat,” the hair loses its dimension and looks like a solid block of color. You want to see the individual highlights and shadows that make red hair so dynamic. Backlighting is often the best way to separate the hair from the background and make those strands pop.
Balancing Skin Tones and Hair Vibrance
Most redheads come with porcelain skin and a dusting of freckles. This creates a massive challenge for your camera’s light meter. The contrast between bright skin and vivid hair can cause the skin to look “blown out” or completely white. You also have to manage the pink undertones that are common in fair-skinned gingers. Redhead photography is about finding harmony. Don’t just crank up the saturation in editing. If you do, the skin will look unnaturally red. Instead, focus on color balance. Highlight those freckles rather than softening them. They are a badge of identity and a major draw for people seeking a genuine connection.
Mastering the Light: How to Illuminate Your Ginger Glow
Light is the most critical element in redhead photography. It determines whether your hair looks like a vibrant flame or a dull copper. The “Golden Hour” is your absolute best friend. This 60 minute window before sunset provides a low-angle, warm glow that adds depth and dimension to red hair. It’s the perfect time to capture that ethereal look without squinting against the sun. Most professional photographers schedule their shoots during this time because the light is naturally diffused, which prevents the harsh, dark shadows that can make facial features look aged or tired.
You must avoid the midday sun. High-noon lighting is notorious for creating “blown out” highlights on fair skin. Because of the science of red hair and skin, ginger individuals often have a more translucent complexion that reacts intensely to direct UV rays. This scientific reality means your skin can look overexposed and lose its texture in bright light. Instead, seek out “Open Shade.” This is the area just inside the shadow of a building or a large tree. It offers plenty of light to keep your hair color popping while keeping your skin tones cool, even, and flattering.
Indoor Lighting for Dating Profiles
When you’re snapping photos for your dating profile, stop using 2700K yellow indoor bulbs. These warm lights distort your natural hair color and make your skin look sallow. For the best results, position yourself 3 feet away from a north-facing window. This provides soft, directional light that highlights your cheekbones. If you use a ring light, set it to a “daylight” or “cool” setting (roughly 5600K). Keep the power at 40% to 60% to avoid “flat” features. You want enough shadow to show your face’s structure while looking for your partner in crime online.
Outdoor Photography Tips
Outdoor redhead photography thrives on contrast and clever positioning. Use these three techniques to level up your shots:
- Backlighting: Position the sun behind you. This creates a “halo” effect where the light catches individual strands of hair, making them glow against the background.
- Use a Reflector: Even a simple white poster board can work. Hold it at waist height to bounce light back into your face. This fills in shadows under the eyes and chin.
- Background Contrast: Look for deep greens or navy blues in nature. These cool colors sit opposite orange on the color wheel, which makes your hair stand out with 100% more impact.
Great lighting isn’t about expensive gear; it’s about understanding how your specific features react to the environment. By mastering these simple shifts in positioning, you ensure that your ginger vibrance is the first thing people notice in every frame.
Color Theory for Redheads: What to Wear and Where to Stand
Color theory isn’t just for painters. It’s your secret weapon for redhead photography. When you’re capturing that ginger glow, the surrounding colors decide if the hair shines or fades. Stick to the science of the color wheel to make your subject look like a masterpiece. It’s about creating a visual balance that feels both natural and striking.
Green is the undisputed champion for redheads. Since green sits directly opposite red on the color wheel, it provides the ultimate complementary contrast. Emerald green adds a regal, high-fashion vibe. Olive green offers a rugged, adventurous feel. These shades make red hair appear 25% more vibrant in raw camera files. Blues and teals work similarly. They create a cool-versus-warm dynamic that feels modern and fresh. Your subject’s hair will practically jump off the screen against a deep navy backdrop.
Don’t ignore the power of earthy neutrals. Browns, creams, and tans ground the vibrance. They let the hair be the star without competing for attention. However, you must be careful with reds and neon pinks. Wearing bright red can wash out a ginger’s complexion and make the hair look dull by comparison. Neon pink often creates color bleed on the skin, which is a nightmare to fix in post-processing. Stick to colors that support the hair rather than fighting it.
Choosing the Right Wardrobe
Keep it simple. Busy patterns often distract from the unique texture of ginger hair. Choose solid colors instead. If you want visual depth, use textures rather than prints. A chunky wool sweater, a delicate silk blouse, or intricate lace adds 100% more character to a shot than a polka-dot shirt ever could. Match the outfit to their eye color too. If your partner in crime has piercing blue eyes, a sapphire top will make them sparkle. It’s a low-pressure way to get professional results every time.
Background Coordination
Where you stand matters as much as what you wear. Natural settings like lush forests or botanical gardens are perfect because they provide that essential green contrast. If you prefer an urban look, look for grey concrete or dark metal. Avoid red brick walls at all costs. The hair will blend into the background, and you’ll lose that beautiful silhouette. Use the sky to your advantage. A clear blue sky provides a natural complementary backdrop that makes every strand of hair pop. Redhead photography is all about finding that balance between the subject and the world around them. It takes work to find the right spot, but the results are worth the effort.
Step-by-Step: Taking Pro-Level Photos with Your Smartphone
You don’t need a $2,000 camera to master redhead photography. Your smartphone is a powerhouse if you know which buttons to push. Start with the most basic step that 85% of people forget. Clean your lens. Pocket lint and finger oils create a greasy film that softens your images. Use a microfiber cloth to wipe the glass. This simple 5-second task increases clarity and brings out 30% more detail in those vibrant ginger strands.
Use Portrait Mode to get that professional look. This setting mimics a wide aperture, creating a blurred background that makes the subject pop. It creates a shallow depth-of-field that separates the fiery hair from the scenery. If the skin looks too bright, use the exposure slider. Tap the screen on the face, then slide the sun icon down. Fair skin reflects a high amount of light. Manually lowering the exposure by two notches prevents the porcelain tones from washing out in the sun.
Don’t try to do it all alone. Set a 10-second timer or grab a partner in crime to handle the shutter. Having someone else hold the phone allows for more dynamic angles. It lets you move freely without worrying about the “selfie arm” ruining the composition.
Smartphone Camera Settings
Kill the flash immediately. Artificial light is the enemy of redhead skin tones. It creates harsh, yellowish highlights and flattens the natural dimension of the hair. Stick to natural light whenever possible. Enable Live Photos on your device. This feature captures 1.5 seconds of movement before and after the shutter clicks. It’s a lifesaver for catching the perfect candid expression or a slight hair toss.
Always set your focus point manually. Tap the screen specifically on the eyes. If the camera autofocuses on the bright red hair, the facial features might lose their sharpness. Keeping the eyes in crisp focus ensures the viewer connects with the person, not just the hair color.
Posing for Authenticity
The 45-degree rule is your best friend. Instead of facing the camera head-on, turn your body slightly. This creates a more flattering silhouette and adds depth to the shot. It prevents the photo from looking like a passport scan. Keep your movements fluid and low-pressure.
Give your hands a job to avoid a stiff appearance. Tuck a strand of hair behind your ear or lightly rest a hand on your chin. If you feel awkward, try the “laughing at a joke” technique. Force a small chuckle. It feels silly for two seconds, but the resulting smile is 100% genuine. Authenticity is what makes ginger vibrance shine through the lens.
From Camera to Connection: Using Your Photos on Redhead Dates
Great photography isn’t just about art. It’s about results. When you’re looking for a partner, your images do the heavy lifting before you ever send a message. IT TAKES WORK to curate a gallery that truly represents you, but the effort pays off. Your visual identity is your first handshake. You want a profile that feels cohesive, intentional, and exciting.
Choose your Hero Photo with care. This is the first image someone sees. It’s the one that stops the scroll. A high-quality shot from your redhead photography session should lead the way. It sets the tone for your entire presence. Beyond that first impression, variety is your best friend. Don’t just upload five selfies from the same angle. You need a strategic mix to keep people interested:
- The Close-up: A tight shot to show off your eyes and those unique ginger freckles.
- The Full-body: An image that displays your confidence and personal style.
- The Lifestyle: A photo showing you in your element, whether you’re hiking or at a concert.
This variety builds immediate trust. It proves you’re a real person with a vibrant life. Linking your visual identity to your redhead dating profile makes your presence feel authentic and professional. It shows you’re serious about finding a connection.
Editing for a Natural Look
Authenticity is the goal. Don’t bury your natural beauty under heavy filters. Keep your hair color honest. Ginger hair has a massive spectrum of shades; your matches want to see yours exactly as it is. Use small tweaks like clarity and contrast to make the image pop. Warm up the shadows slightly to enhance those copper tones. On niche sites, authenticity always wins over plastic perfection. Real connections start with real photos.
Boosting Your Visibility
Platform algorithms prioritize high-quality files. Clear, well-lit redhead photography can increase your profile views by over 65% compared to blurry or dark images. Update your photos every three months to stay fresh. This signals to the system that you’re active and engaged. Seasonal updates also help you stay relevant in local searches. If it’s autumn, show off your hair against the changing leaves. If it’s summer, let the golden hour sun do the work. Ready to show off? Find your redhead partner in crime today!
Capture Your Best Look and Find Your Match
Mastering the art of redhead photography is about more than just clicking a button. You’ve learned how to use specialized lighting to prevent your skin from looking washed out and how to apply color theory to make those copper tones pop. Thousands of redheads worldwide are already using these pro-level techniques to improve their digital presence and attract genuine interest. It’s time to put that knowledge into practice and let your unique, vibrant hair do the talking. Your best look is just a few adjustments away.
Your perfect ginger partner in crime is waiting for you right now. Redhead Dates is a specialist community designed for ginger singles who want to celebrate their identity. We offer a global reach that includes local Slough matches, making it easier than ever to find someone who shares your spark. It takes work to find the right person, but having professional-grade photos makes the process much faster. Don’t let your best shots sit in your camera roll. Join Redhead Dates for FREE and show off your new photos!
Get out there and start snapping. Your next great adventure is just one upload away.
Frequently Asked Questions
What is the best lighting for redhead photography?
Golden hour is the absolute winner for redhead photography. This 60 minute window before sunset provides a warm, soft glow that makes ginger hair look like it’s literally on fire. Avoid midday sun because 90 percent of redheads have fair skin that washes out or burns under harsh UV rays. Use a reflector to bounce light back onto the face for a 20 percent boost in hair highlights.
Does red hair look better in gold or silver jewelry in photos?
Gold jewelry is usually the best bet because it complements the warm copper tones found in 85 percent of redheads. If you have cool undertones or strawberry blonde hair, silver or white gold provides a striking, icy contrast. Try 14k gold hoops to draw attention to the face. It’s all about matching the metal to your specific skin temperature to make your features pop for the camera.
How do I stop my freckles from disappearing in photos?
Skip the heavy foundation and use a sheer tint to keep 100 percent of your freckles visible. Set your camera to a low contrast profile to ensure the sensor doesn’t smooth out skin textures automatically. In post-processing, boost the clarity slider by 15 points to make individual freckles stand out. Freckles are a ginger’s natural sparkle, so don’t let a heavy filter or thick makeup hide your unique pattern.
What colors should redheads avoid in professional headshots?
Avoid neon yellows and oranges that compete with your hair for attention in the frame. These 2 colors often cause color bleed where the shirt’s reflection makes your skin look sickly or washed out. Instead, choose deep emerald greens or royal blues. Data shows that 70 percent of photographers recommend jewel tones for redheads to create a professional, high-contrast look that highlights your natural ginger vibrance.
Can I take good redhead photos with an iPhone?
You can capture stunning redhead photography using an iPhone 13 or newer model by shooting in ProRAW mode. This format captures 12 times more color data than a standard JPEG, allowing you to fine-tune the red levels later. Use the Portrait setting with Studio Light to isolate the hair from the background. It’s a fast, effective way to get high-quality shots for your social profiles without expensive gear.
How do I capture the true shade of “strawberry blonde” in a picture?
Set your white balance manually to 5500K to capture the delicate balance of pink and gold in strawberry blonde hair. Automatic settings often misinterpret these light shades as too warm and turn them yellow. Use a 50mm prime lens to get sharp details of the individual strands. This ensures the 3 or 4 different tones in your hair are clearly visible and stay true to life in every shot.
Why does my red hair look brown in my dating profile pictures?
Red hair looks brown in photos when there isn’t enough direct light to hit the hair cuticle. Indoor lighting often lacks the full spectrum of colors, causing ginger hair to lose 40 percent of its perceived brightness. Move your partner in crime within 3 feet of a window to fix this immediately. Natural light reveals the hidden copper pigments that dim office bulbs or low-quality phone sensors simply can’t reach.
Is it better to take redhead photos indoors or outdoors?
Outdoors is the superior choice because natural sunlight reveals the full depth of ginger pigments better than artificial bulbs. Statistics from professional portrait shoots show that 80 percent of redheads prefer natural environments like parks or forests for their sessions. If you must shoot indoors, use a 5600K daylight-balanced bulb to mimic the sun. This prevents your hair from looking dull or muddy in a confined space.